

How To Set Hunter Pgp Sprinkler
Hunter PGP Sprinkler Heads
PGP® Rotary Sprinklers Installation and Adjustment Instructions
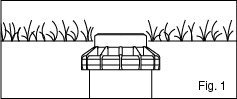
The PGP® popular-upwardly sprinkler should be installed at finished course as shown in the illustration (Fig. 1).
Arc Adjustments
Adjustable heads are preset to approximately 180°. Sprinklers may be adjusted with h2o on or off. Information technology is recommended that initial adjustments be fabricated before installation.

- Using the palm of your mitt, rotate the nozzle turret counterclockwise to the left stop to consummate any interrupted rotation cycle (Fig. two).
- Rotate the nozzle turret clockwise to the right stop. This is the stock-still side of the arc. The nozzle turret must be held in this position for arc adjustments. The correct finish does not modify.

To Increment the Arc:
- Insert the plastic fundamental finish of the Hunter wrench (click hither to purchase ) into the adjustment socket (Fig. 3 & four).
- While belongings the nozzle turret at the correct stop, turn the wrench clockwise. Each total 360° turn of the wrench will increase the arc xc°.
- Adapt to any arc between xl° and 360° (Fig. v).
- The wrench will stop turning, or there will be a ratcheting noise, when the maximum arc of 360° (full circle) has been reached.
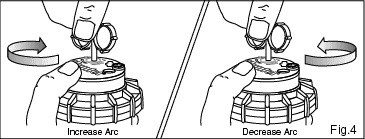
To Decrease the Arc:
- Insert the plastic key end of the Hunter wrench into the aligning socket (Fig. iii & 4).
- While holding the nozzle turret at the correct stop, plough the wrench counterclockwise. Each full 360° turn of the wrench will decrease the arc 90°.
- Adapt to any arc betwixt 40° and 360° (Fig. 5).
- The wrench volition finish turning, or there volition be a ratcheting noise, when the minimum arc of 40° has been reached.
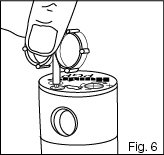
Radius / Distance of Throw
Insert the steel hex end of the Hunter wrench into the radius aligning spiral (Fig. vi). Plow the spiral clockwise (into the stream of h2o) to subtract the radius, or counterclockwise to increase the radius. Radius can be reduced up to 25%.
Caution: Turning the adjustment screw clockwise more than five full turns may result in a lost radius adjustment screw.
Precipitation Charge per unit Adjustment
If you accept excessively moisture or dry out areas, y'all can alter the nozzle in the sprinkler to increase or decrease the precipitation charge per unit. For dry areas, install a larger nozzle. For wet areas, install a smaller nozzle.
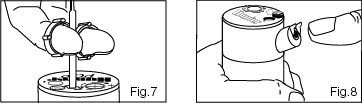
Nozzle Installation
- Insert the plastic primal finish of the Hunter wrench into the lifting socket of the sprinkler and turn 90°. Pull the riser upwards to gain admission to the nozzle socket (Fig. viii).
- Using the hex cardinal of the Hunter wrench, plough the radius adjustment spiral (Fig. 6) counterclockwise to exist certain information technology is not blocking the nozzle socket opening. If a nozzle is already installed, it tin be removed by bankroll out the adjustment spiral and turning on the water, or by pulling outward on the nozzle "ears" with a pair of needle-nosed pliers.
- Slip the desired nozzle into the nozzle socket (Fig. 7). Note that the socket is angled upwardly 25°. The "ears" should be adjusted so that the nozzle range screw threads directly down between them. Then tighten the nozzle range screw. The raised bump with an arrow on the rubber cover will e'er indicate the location of the nozzle and management of water flow when the sprinkler is retracted.
Adjustment the Correct (Stock-still) Side of Arc
If the correct side of the arc is not properly aligned, the results may be a moisture walkway or a dry out turf expanse. The right side arc tin easily exist realigned. One way to realign the correct cease is to plough the whole sprinkler trunk associates and the plumbing equipment beneath it, left or right to the desired position. This may require temporary removal of the soil around the sprinkler to allow you lot to grip the sprinkler housing.
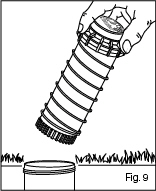
Another way to reset the correct arc is to unscrew the torso cap counterclockwise and remove the internal associates from the body. Once removed, rotate the nozzle turret to the right stop, spiral the internal associates back into the body with the nozzle aligned to the correct side of the area you want irrigated (Fig. 9). At this bespeak you have realigned the right arc stop, and y'all tin conform the left arc to an advisable setting.
Note: It is not necessary to dig upwards and remove the whole sprinkler to realign the right arc.
Source: https://www.rainmakernh.com/diy/pgpr-rotary-sprinklers-installation-and-adjustment-instructions
0 Response to "How To Set Hunter Pgp Sprinkler"
Post a Comment